Plant Warranty
Sunflower Landscapes’ warranty covers the cost of removing and installing the replacement plant as well as 50% of the retail cost of the plant.
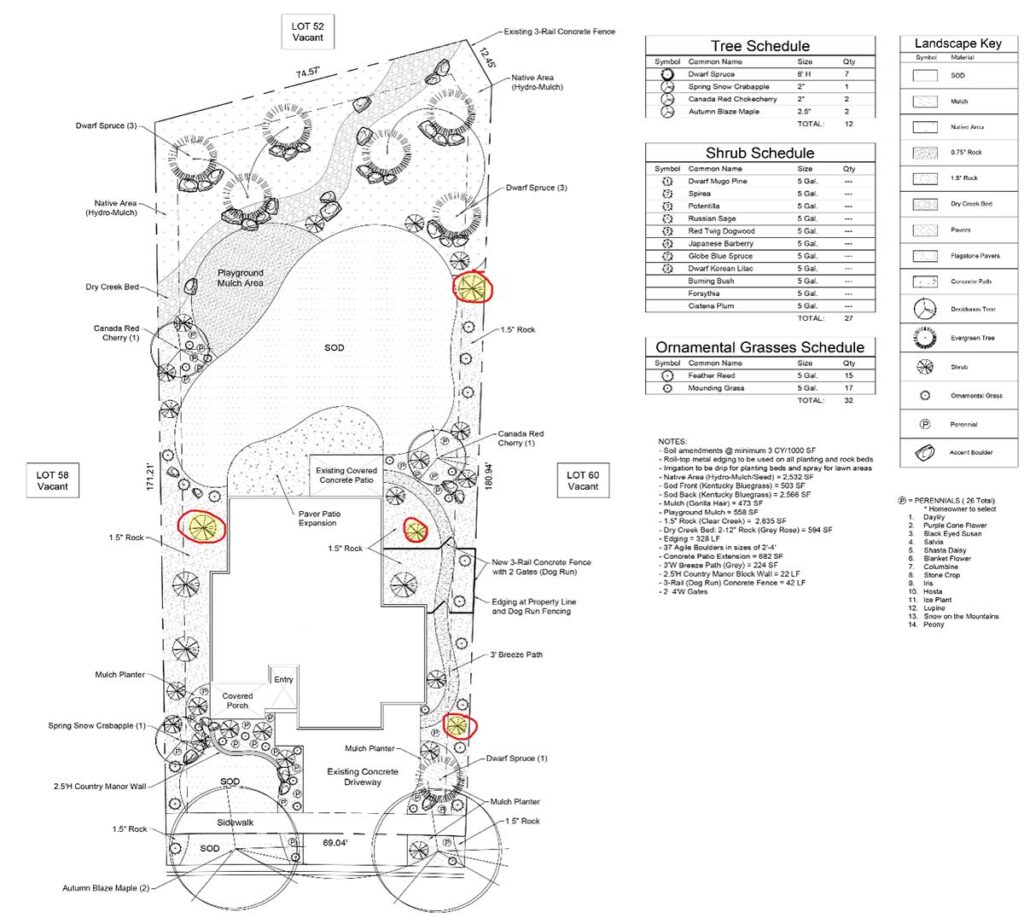
If you have plants that appear to be struggling or have died, please mark the location of the plant(s) on your landscape plan (provided to you in this packet) and email that copy to:
warranty@sunflower-landscapes.com
Please also include in the email a clear photo of the plant in its entirety (if able) and a few close-up pictures (if necessary) of any points of interest. These could include, but are not limited to, bark and/or leaf damage or discoloration, sap oozing, insect/animal damage, weather damage, etc.
If you no longer have a copy of the plan, you can reach out to us, and we can provide you with another copy for you!
Example:

Irrigation
Irrigation Controller (Hunter X-Core / Rain Bird ESP-TM2)
Please note that any adjustments to the controller within the first year of installation will effectively void all warranties of sod, trees, and plants.
The use of programs (ABC) allows users to isolate certain zones to specify days and times. Sunflower uses program ‘A’ for sod, program ‘B’ for plants and trees, and program ‘C’ for miscellaneous applications (ponds, pools, gardens boxes, water features, etc.)
Program A: Sod – 3 days per week, 20 min per zone. (after initial 6-week establishment period, running 3x daily)
Program B: Drip – every day, 30-40 minutes.
Program C: Miscellaneous – set according to needs.
Sunflower follows ROYGBIV wiring pattern for sod zones. The black wire is a drip zone, and anything wired to the right indicate additional drip zones and/or miscellaneous needs. The white wire is used as a common.
EXAMPLE: 3 sod zones (1 front yard, 2 backyard), 1 drip irrigation, and 1 bubbling rock.
Red, orange, and yellow wires indicate sod zones. They will be wired in terminals 1-3. These will be program ‘A’. For this, there will be two start times – before 10 AM and after 6 PM, on Monday, Wednesday, and Friday. They will run for 15-20 minutes EACH (totaling 45-60 minutes both morning and evening).
Black wire is for drip. It will be wired in terminal 4. This will be program ‘B’. There will be one early morning start time every day of the week. This will run for 30 minutes, daily.
Green wire is for the bubbling rock. This will be wired in terminal 5. This will be program ‘C’. There will be an autofill function on the water feature itself, communicating to the controller when the water is needed; however, there will be one start time 2-3 days week. The run time will vary depending on needs, but 5-10 minutes is typical.
Adjustments: Hunter controls are shown in blue, Rain Bird controls are shown in green.
To adjust the date and time on your controller, use the up and down/plus and minus buttons and advance to the next selection with the right and left arrows. The selected figure will flash to indicate that it is currently being adjusted.
Program selection is made with the PRG button / Program Select button. They will continuously cycle through ‘ABC’, displayed on the screen.
Start time indicates what time(s) of day the irrigation will run. If there are times of 5 AM in the first start time (1) and 5 PM in the second (2), both on the program ‘A’, this is simply showing that any zones set to run on program ‘A’ will run for a set amount of time (run time) at 5 AM and 5 PM.
Run time indicates how long the irrigation will run. The left number displayed is communicating to specific terminal (zone) containing wires in the lower panel of the controller, which correspond with individual valves found in the manifold box. The flashing number is how long the selected zone will water.
Water days will determine which days the irrigation will run. From here, you can designate which days you want certain programs (ABC) to operate.
Seasonal adjust allows you to control the irrigation for the season. Here you can increase or decrease the amount of time the entirety of the scheduled run times set by a percentage. Increasing 10% to 20 minutes adds 2 minutes, 20% is 4 minutes, etc.
Manual watering will allow you to select and water individual zones in addition to the programmed system. Holding the right arrow (both controllers) for 3 seconds will water through the entire system, once. This can be super helpful during the heat of the summer.
If you aren’t clear on what you are trying to achieve by editing the controller, please call Sunflower Landscapes instead of doing it yourself. The programs are set to offer long term sustainability and the slightest adjustments can result in potentially irreversible damage.
Lawn Care
New Lawn Care
After the day of installation, your new lawn will be receiving a lot of water. If your sod was installed by Sunflower Landscapes, this is the watering plan we follow (varying only in length during hotter/cooler months).
For the first 6 weeks, water will be applied 3 times daily (6am – 12pm – 7pm). This timeframe is known as the Establishment Period. This amount of water will completely saturate the targeted area and it is very important that there is no foot traffic (including pets) in the area during this establishment period. Safeguarding this space will prevent any unwanted holes or divots in the yard and ensure that the yard is flat and consistent for future activities.
The first mow will occur between week 2-3 of the establishment period. To tell if the grass is rooted enough to be walked on, gently grab a handful of grass (12-18” from the edge of the lawn) and lift straight up. If you are unable to lift the area, you are ready to mow. If you feel the grass lift from the soil below, it’s best to wait 3-4 days and retest in a different area.
- Once you’ve identified that it’s time to mow, we need to allow the area to dry out before putting the weight of ourselves and the lawn mower on the yard. This can be done by locating your irrigation controller and switching the dial to the “OFF” position (one click left of upright). This needs to be done at least 24 hours in advance of mowing, but 36 hours is preferred.
- To mow, set your mower cutting height at the highest setting and attach the bag feature to prevent clippings from returning to the yard. Keep in mind that you may have to mow the yard twice as the grass will be long in length, but DO NOT exceed twice for the initial cut. It is best practice to alternate the direction of mowing for each time over. Avoid mowing during the heat of the day (10am-3pm) to minimize the stress created by this procedure.
- Once you have finished mowing, immediately return to the irrigation controller, and adjust the dial to the upright, “RUN” position. After you have mowed for the first time, continue to keep traffic off the area.
After the first 6 weeks, please reach out to Sunflower Landscapes and we can come by to assist in adjusting the controller to our recommended settings for sustainable, year-round coverage. At this point, mowing can be done weekly or as needed. Depending on the temperatures at the end of the 6-week establishment period, your lawn is likely to show some heat stress (yellowing) moving forward. This is due to the significant reduction in the amount of water being applied but in compliance with Colorado Springs Water-Wise Regulations (more information at https://www.csu.org/Pages/WaterWiseRules.aspx). During this time, don’t be afraid to drag out the hose and give your lawn some extra water. Please refer to the Green Belt Turf form for the best fertilization schedule for your type of sod. Sunflower uses Green Belt for both the Kentucky Bluegrass and Survivalist Blend (fescue) grass.
Existing Lawn Care
If you didn’t aerate in the fall, early spring (late-March to early-May) is a good time to get that done. Aeration will open the soil allowing moisture to penetrate deeper, roots to spread further, and the yard itself to soften. This will encourage healthy new growth. The recommended application in the spring is a “weed and feed”. Personally, we prefer Scott’s brand for bluegrass varieties.
It’s always good practice to rake the yard before the season starts. Winter snows tend to “mat” the grass blades down. This results in dead blades below the surface that prevent sunlight and water from reaching the soil. Raking will encourage decomposition and appropriate wet/dry cycling for the yard.
Before you get the mower out of storage, it can be beneficial to remember that your grass is still in a dormant state. It’s best to let the grass receive the needed water and sunlight for a few weeks (even a month) before working a routine of regular mowing.
Winterizing
Preparing for the winter is a required step in caring for your new landscaping.
The irrigation system will need to be drained and turned off:
- Locate the water source in your utility room. The sprinkler line is typically the first ‘tee’ above the water meter for your house. Turn the ball valve to a perpendicular position to stop the water flow.
- Outside the house, locate the backflow (brass and copper hardware fixed to the side of the house) and manifold box (green and purple lid in the ground). Open the manifold box lid and open the drain valve at the end of the PVC piping. Water should start coming out.
- On the backflow, turn both valve handles a couple of times to release the pressure built up in the unit. Occasionally, you will audibly hear the vacuum seal being broken. Turn both valve handles 45 degrees so that the position is half open, half closed.
- Next, locate the drain waste cap on the brass elbow immediately beside where the copper line emerges from the house (not available on all systems). REMOVE AND KEEP CAP (tape to pipe for convenience). This cap is removed to allow air to displace that water and effectively drain the system.
- Lastly, take a bucket back to the water source from step 1. On the bottom of the valve turned to shut water back off, there should be another drain cap (similar to step 4). With the bucket below the drain, loosen this cap as well and capture the water to discard.
At this point, our system has been drained and is ready to weather the upcoming cold mornings. Another damage-preventative measure that can be taken is insulating the copper or brass by wrapping them in a bath towel or similar with some tape. Pool noodles are also a great way to insulate.
With the irrigation system shut down, hand watering for various plants will be necessary to ensure they survive the cold season. Winter is the driest season in Colorado. It is recommended to water your plants and trees at least twice a month through the winter. You will want to make sure the root ball is completely moistened to ensure that, in the event of a deep freeze, the roots freeze WET, not dry. If the roots freeze without proper moisture in the soil, it is common to see winter die-back in the spring once the plant begins to push new growth for the season or, in the worst-case scenario, complete failure to succeed.
Your grass will also need to continue to be watered. In Colorado, this period typically runs from November through April. During these months, you should water 1-2 times per month. Water the lawn when the air temperature is above 40 degrees. Water at mid-day, if possible, so that the water has time to soak into the ground and does not quickly freeze. If the water freezes, solid ice could suffocate your lawn and leave it matted.
You will need to water everything in your yard that was planted during the last growing season. If the grass, plants and trees have not been through winter yet, then they need to be winter-watered. You will also want to water anything that is exposed to heavy wind and/or a lot of sun.
Evergreen trees and shrubs should be watered from the top of the limbs to the base to add humidity to the foliage during winter in addition to the root watering. Because they do not shed their foliage in the winter, the needles and leaves can experience browning or bleaching from the dryness and the wind.
FAQs
How long should I leave my newly planted trees staked?
One year is all they require to grow enough of a root system to support their canopy. Leaving stakes and straps on trees for longer runs the risk of girdling the trees, stressing them out and potentially killing them.
Why are the root balls of my trees planted high in the ground?
Most trees/plants die as a result of being planted too deep. Planting the root ball 2-4” above grade (and even higher in heavy clay soils) ensures your plants will have enough oxygen to thrive.
Some plants like to ‘sleep in’!
Before you go and dig out any shrubs, remember that some plants wake up much later from dormancy than others. A few of these are Butterfly Bush, Hydrangea, Peony, and Blue Mist/Dark Knight Spirea. Some will even die back completely to the ground each year. Be patient and make sure they are receiving a normal amount of water! They are just a little bit lazier than their fellow shrubs!
Fire Blight and Colorado
It will not be possible to spot warning signs of fire blight while your plants are dormant but keeping these tips in mind will be valuable in the spring.
Quick tips:
- Wait until your plants are blooming before spraying them with your choice of fire blight spray.
- Avoid over-fertilization.
Quickly prune out branches showing signs of canker, blackening or “Shepard’s crook” (use a disinfectant on your pruners AND the branches between each cut to prevent spreading).
Insect Prevention
Some easy maintenance a homeowner can do to help protect against insect damage in the warmer months is to use a preventative drench in the roots of their plants. You should use the product in the early Spring, before your plants come out of dormancy, so that the plants absorb the product systemically as they pull their stored nutrients from their roots. This will only prevent against bores and other insects that chew into the tree. For topical aggressors, use a spray on your plants while the insects are active.
What should I do to fertilize or treat my plants once they have been planted?
Nutrient rich soil is essential for a plant to thrive. Adding compost as a top dress or directly into the soil when planting can give the plant a wonderful boost! Fertilizers are a great addition once the plants have been in the ground for at least a year before you apply.
Pruning
Spring is the ideal time to prune most of your plants and trees. It is not always necessary, however, so take a good look at your yard before you start snipping!
Quick tips:
- Never prune more than 25% of a tree or shrub.
- Ornamental grasses that you have left tall through the winter will need to be cut down to make room for the new growth. Prune back 8” from the base and make sure you fan out the dried blades with a rake or your hands to make space for the new grass.
- Early bloomers do not get pruned in spring! Keep the clippers away from shrubs like lilacs, nanking cherry, quince, viburnum, honeysuckle, peashrub and weigela. You can always thin out what you need to, but these plants prefer to be pruned in late spring-summer right after they are done blooming.
- Structural pruning of young shade trees is typically done in late winter, before trees break dormancy.
- Deadheading spent blooms as the season progresses can help your landscaping looking neat and potentially encourage longer bloom times.
Mulch Area Upkeep
Renewing your mulch helps retain moisture, keeps roots cooler, and can make weeds easier to pull. Regular ‘top-offs’ and ‘fluffing’ with a pitchfork can help keep the mulch beds from looking stale and flat.
Sprinkler Adjustment
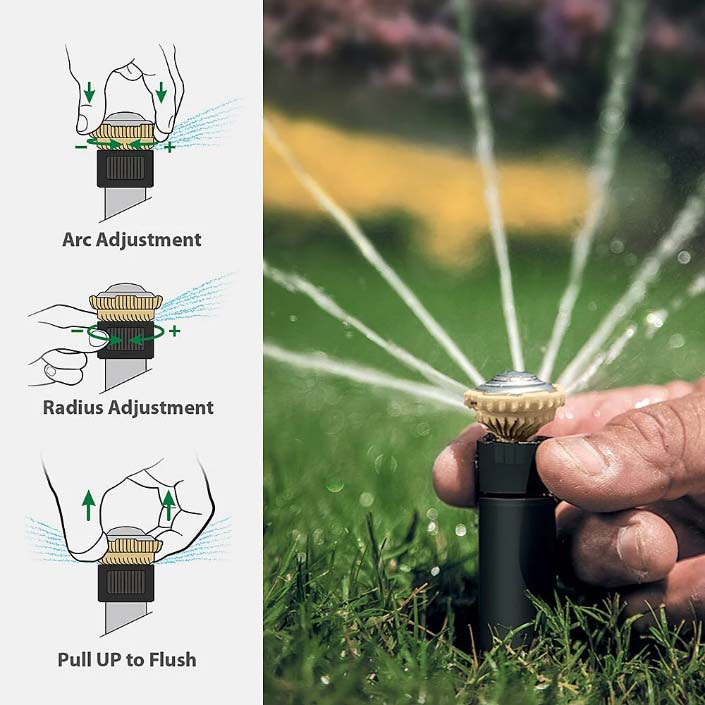
Rain Bird Nozzles

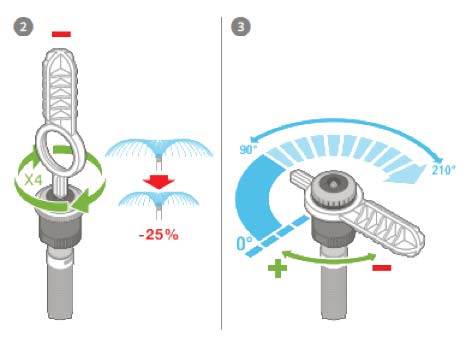
Hunter Nozzles

